Archive for February, 2008
Lunar Eclipse – Photos and more!
On Wednesday February 20th, 2008, we in North America were treated to the last total Lunar Eclipse until Dec. 2010. As the event time approached here in Calgary the weather was looking perfect, clear skies and temperature around +1 C.
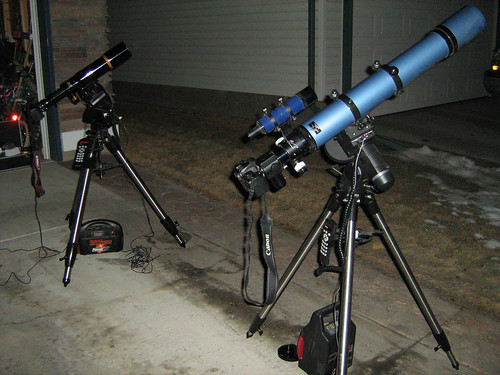
 About 6:15 PM I started setting up the scopes I was going to use. I set up a William Optics 80 MM Zenithstar FD scope on my Celestron CG5 computerized mount with my Canon 30D camera, a Skywatcher 100mm ED refractor on my Skywatcher HEQ 5 Computerized mount and my Canon Digital Rebel XT. I had invited neighbours to come view the event via a note attached to our community mailbox so I also set up an William Optics Zenithstar 66mm SD on a photo tripod, with a 15mm plossl eyepiece and a brand new Skywatcher 6″ Dobsonian telescope that I just bought for the kids with a 25mm plossl eyepiece. The little dob came from my friend Blair over at SkyVue Telescopes. These are perfect, inexpensive (under $300.00) scopes for beginners and experts alike. I also had a set of Celestron 15×70 binoculars on hand.
 As the moon started to rise over the houses at the end of the street, I started snapping photos with the two cameras. I would shoot 3 or 4 images every couple of minutes. By the end of the eclipse, I had shot over 1000 images, filling 3 CF cards (4 GB, 2GB and 1 GB).
We had several neighbours come over to take a look through the scopes and all were impressed by the incredible site! As Saturn was also right by the full moon, I swung the Dob mounted scope over to it. The view in this scope of the ringed planet was stunning, and everyone really enjoyed it. Throughout the night I swung this little scope around to other beautiful celestial sights.
After downloading all the pictures to my MacBook Pro, I started the task of sorting, picking and some light processing using my favourite image processing program Adobe Lightroom. If you are interested in the recipe that I used for taking, sorting and processing the images, read on below. Out of the 1050 or so images taken, I have published about 80 of them to my Picasa web photo site at Google. I have also published about 20 of the better images over on my Flickr site.
If you are interested in learning about the technical details and work flow that I use with Lightroom (including the processing), read on. I will also be creating a second post on how to photograph the moon and lunar eclipses.
Photo Workflow and Processing
Photographing the moon, let alone a lunar eclipse is not easy. Try it someday. Here is what I used and how I set up to take the images.
 I attached my Canon Digital Rebel directly to my Skywatcher 100mm ED using a T-ring adaptor and my 30D to my William Optics 80mm Zenithstar FD the same way. These scopes were each mounted on Computerized equatorial mounts. With my DSLR bodies attached to the telescopes they operate like very large telephoto lenses, in this case (575MM and 900MM). I then use remote triggers to actually click the shutter to avoid vibrations from pushing the shutter release buttons. The scopes I used are also ED refractors or apochromatic refractor telescopes. These are typically much more expensive then entry level achromatic refractors. The objective lenses and designs of these scopes allow you to view and photograph bright objects without chromatic aberration or the violet blue fringing that you can see on the edges of bright objects using achromatic refractors. Due to the nature of other telescope designs you don’t typically get this with scopes other than refractors (or what most people think of as a telescope). Focusing was done via the camera’s viewfinder and checked on the LCD screen. Focusers on the scopes were then locked tight so they wouldn’t slip, but I continually checked the focus throughout the night.
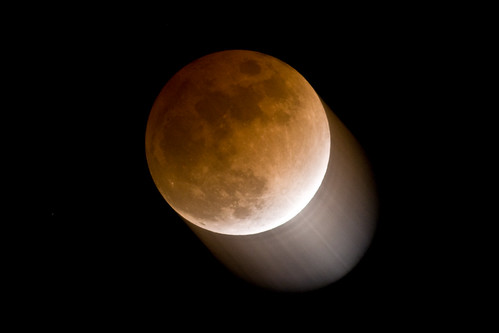 During a lunar eclipse you have to take longer exposures than you would if you were just photographing the moon because the moon is not as bright as it usually is. The image here is a goof when I hit the slew button on my mount’s hand controller by accident during a half second exposure and the scope moved.
For the early stages of the eclipse when there wasn’t much colour yet, I had the cameras set up at ISO 100 (sensor sensitivity) and very fast shutter speeds (between 1/250th of a second to 1/500th). As the eclipse went on the and the orange colour started to show, I jumped my ISO up to 800 and slowed the shutter speed gradually. The slowest exposure I took was .8 seconds during totality. This was necessary to catch the true colour of the moon and the lowering of it’s brightness. While looking at images afterward I see that I probably could have gone a little longer on some of the exposures, it worked out ok because I shot all images in RAW format and was able to boost the exposure in software after the fact.
As the moon started to come out of totality, I started increasing the shutter speed gradually and near the very end, set the ISO back to 100 and very fast shutter speeds.
Once everything was done and the scopes were put away, I downloaded all of the images to my MacBook Pro. I then copied all the pictures to my external hard drive and then imported them into a new catalogue in Adobe Lightroom. Lightroom has become one of my favourite programs to use in the last two months (on both Windows and Mac) and I find it an indispensable tool, for sorting, cataloguing, tagging, making image adjustments and exporting all of my digital photos. I will soon be posting a complete review of Lightroom on my main blog here.
I used Lightroom to tag all of the photos as I imported them. I added the tag Lunar Eclipse February 20th 2008. Once all the images were imported I selected all of the images shot with one scope and added the tag for what scope they were shot with. Then did the tags for the other scope.
The next step was to look at each image in Library mode and pick the ones I wanted. All you have to do is hit the P key to Pick and the U key to unpick. Once the images I had chosen were flagged as picked, I applied a filter (with one click) to them, to only show the picked files and went through unpicking all of the ones I wouldn’t publish.
I got my numbers down from 1050 pictures, to about 160 then finally to about 80, about 40 from each scope and through the various stages of the eclipse.
The next step was to use Lightroom to make fine corrections and adjustments to the images. Lightroom is great because any changes are made to the database only and never to the original image. Once all your adjustments are made and the image is exported out of Lightroom are the adjustment burned in to the new image. This way I can tweak my edits over and over (even completely removing them) and not do any harm to my original images. I tried to keep my adjustments minimal, only tweaking a few settings.
I ended up adjusting the exposure from slightly to just under one full exposure greater, but for the most part almost all of the images got less than .5 of an exposure more. The fill light adjustment was used to bring out some detail in the dark areas of the moon, again usually not very much and just under a setting of 20. A popping contrast boost was given via the clarity setting in Lightroom. Finally I adjust luminosity and colour noise reduction and added some edge sharpening.
Using Lightroom and some third party free plug-ins I exported the images to Picasa. After exporting each to a Picasa album, I then went through the picked images again and flagged about 20 with a colour label to sort them for upload to Flickr, which was again done directly from Lightroom.
In total the image sorting, picking, processing and exports took a total of about 3 to 3.5 hours. A lot shorter than if I had to edit each image separately in a different program. I probably could have sped the process up even more if I had saved some presets and then applied these to similar images as a batch function. I skipped this as I wanted complete control over each image.
As I wrote the first draft of this post, i realized that I had some good tips on Lunar photography to pass on. I readjusted this post back to what I did for these images, and will continue to work on my lunar photography how to blog post and get it up here soon.

Full Lunar Eclipse Tonight, February 20th, 2008
For the last time for about the next three years, we will get to see a total lunar eclipse on Wednesday February 20th, 2008. The Eclipse is visible virtually every where in North America.
The moon will begin to move into the Earth’s shadow at approximately 6:30 PM Mountain time. At approximately 7:48 it will be completely in the earth’s shadow, where it could turn an ochre red or orange colour. The moon starts to come out of the earth’s shadow at approximately 9:07 PM and the eclipse ends at approximately 10:20 PM.
With the eclipse happening early in the evening, I am hoping for a clear night to be able to photograph all the different stages of the effect. Unlike the August Lunar eclipse where I fell asleep at 2:15 AM and missed the start at 3:00 AM. I managed to wake up at 6:00 AM and caught a small part of it.
The plan is to photograph using two different telescopes (and two cameras) to catch the event. I will also have a couple of other scopes set up for visual observing.
The eclipse will be perfectly visible with the naked eye, through binoculars, or through small scopes.
I will be inviting neighbours over to view if they wish to see any of it through the scopes.
Hopefully the night will be clear tomorrow giving us a great view of the last lunar eclipse for North American’s in the near future.
Stephen